Today i corrupted MySQL…here’s how

If you want to change MySQL setting innodb_log_file_size to improve performance the top answer on stack overflow says you have to delete the redo log in /var/lib/mysql/ib_logfile* so that MySQL creates it with the new size. Before deleting you obviously shutdown mysql.

But a normal shutdown of MySQL is a fast shutdown which might leave changes stored in logs but not in table pages. This is normally OK as mysql works through the logs and processes all changes.

But by deleting the redo log…you might create an inconsistent database! As table pages might be marked dirty but the changes can’t be loaded anymore from the redo log. I did it many times with fast shutdown not knowing the risk but today mysql got corrupted with the database still working but in inconsistent state.

How to prevent this?

Old answer was: switch off fast shutdown by SET GLOBAL innodb_fast_shutdown = 0
After shutdown you can now safely delete the redo log. But this is only relevant up to MySQL 5.6.8.

So what is the correct way in modern mysql to change innodb_log_file_size?

  • shutdown mysql
  • change innodb_log_file_size
  • start mysql
    • documentation says: “If InnoDB detects that the innodb_log_file_size differs from the redo log file size, it writes a log checkpoint, closes and removes the old log files, creates new log files at the requested size, and opens the new log files.“

Of course we had backups so nothing happened except for the work.

Lessons learned

  • MySQL is really robust: it starts and allows creating a dump even with
    • corrupted databases
    • corrupted mysql database (missing tables etc)
  • read the documentation
  • read all answers on stack overflow carefully – not just the top one 😉

Chrome vs. Firefox

Just as Chrome has its jumping the shark moment* Microsoft moves to Chromium engine…they don’t have any luck with browsers since 1995 😉

I’m migrating to Firefox…

(*) So what’s wrong with Chrome?

  • removing Adblocker API
  • flagging slow sites
  • hiding parts of the current URL in the address bar – protocol + „www.“ are no longer shown. This can be fixed:
    1. goto chrome://flags
    2. Search UI Hide.
    3. Disable these 3.
  • this might be controversial: promoting encryption (HTTPS) in an aggressive way as this is per se a good measure for websites with data entry but is also a burden for website owners.

Many turn to centralized services like AMP by Google and CloudFlare to encrypt their website and make it faster. So these measures weaken an independent web and strengthen big corporations like Google.

Docker in production

Use option userland-proxy=false to avoid having a separate docker-proxy process per mapped port from a container to host. Somehow this option survived with default true into Docker 18.09.

It even isn’t documented anymore: Docs for Docker 17.09 still had a section about option userland-proxy and a good explanation how it works. This page even mentions the advantage of running without userland proxies but with iptables rules instead:

this alternative is preferred for performance reasons

https://docs.docker.com/v17.09/engine/userguide/networking/default_network/binding/

It even contains a warning that with iptables rules port conflicts are harder to detect.

But documentation for Docker 18.09 doesn’t contain an explanation about it nor its performance penalty.

So having a userland process copying traffic from host port to container port from my point of view doesn’t make sense as the same can be accomplished by iptables rules in the kernel. As the necessary rules are completely managed by Docker this is a simple improvement.

Check logging

Check logging in /var/lib/docker/containers/*/*log

  • check if you have verbose containers
  • in my case biggest producer of logs was PHP-FPM. So i had to disable access logs in its config.
  • setup log rotation in Docker

Example config

So my current config /etc/docker/daemon.json looks like this:

{
  "log-driver": "json-file",
  "log-opts": {
    "max-size": "10m",
    "max-file": "3"
  },
  "userland-proxy": false
}

Suprises in software development

Sometimes software development can be quite surprising. For example, one day you get confused because code you wrote doesn’t run as expected. You think about it some time and find a workaround but still can’t explain why it ran unexpectedly. Because you got other work to do you postpone thinking about it further.

Then the next day you read an article which references a change in a programming language and suddenly you get the explanation for that unexpected behaviour the day before. Tada!

This just happened to me with PHP’s ternary operator:

$b = 1;
$c = 2;
echo (!empty($b)) ? $b : (!empty($c)) ? $c : 0;

What do you expect to be echoed? I expect 1 to be echoed which reflects the behaviour of most other programming languages. PHP prints 2 instead. This was the cause for that unexpected behaviour in my program – which i accidentally worked around by not using the ternary operator but didn’t understand why.

PHP groups the ternary operator from left as other programming languages group it from right. This behaviour is explained as request for change in PHP RFC: Deprecate left-associative ternary operator. This article is referenced as RFC for implementation in PHP 7.4. So along with many other changes PHP moves towards doing less unexpected things which is very good.

Associativity in general is explained in this article.

Restore customers from backup in Magento

I recently had two different clients who deleted customers from their instance of Magento1 and Magento2. Although it says:

Once Is Chance, Twice is Coincidence, Third Time Is A Pattern

unknown

i think this is a pattern which needs to be fixed in UI.

But first we have to recover the missing customers. Hopefully you have a sql dump of the shops’s database!

# restore backup into database mage_restore
> gunzip -c magento.sql.gz|mysql mage_restore
# extract customer from this database
> mysqldump -t --skip-extended-insert mage_restore customer_address_entity customer_address_entity_datetime customer_address_entity_decimal customer_address_entity_int customer_address_entity_text customer_address_entity_varchar customer_entity customer_entity_datetime customer_entity_decimal customer_entity_int customer_entity_text customer_entity_varchar wishlist wishlist_item > customers_restore.sql
# import in shop database
> mysql magento < customers_restore.sql

Add

--insert-ignore

if partial data exists in tables (that is: not alle customers were deleted or customers created accounts in the shop after the delete event).

Match orders in Magento 1

After importing the customers we have to link their orders back to their accounts as the reference in an order is set to NULL when the customer is deleted.

-- link orders
UPDATE magento.sales_flat_order as orig inner join mage_restore.sales_flat_order as res on orig.entity_id=res.entity_id set orig.customer_id=res.customer_id;
UPDATE sales_flat_order_grid INNER JOIN sales_flat_order ON sales_flat_order_grid.entity_id = sales_flat_order.entity_id SET sales_flat_order_grid.customer_id = sales_flat_order.customer_id; 
-- check
SELECT orig.entity_id, res.entity_id, orig.customer_id, res.customer_id from magento.sales_flat_order as orig inner join mage_restore.sales_flat_order as res on orig.entity_id=res.entity_id; 

Match orders in Magento 2

-- link orders
UPDATE magento2.sales_order as orig inner join mage_restore.sales_order as res on orig.entity_id=res.entity_id set orig.customer_id=res.customer_id;
-- if you get warnings due to missing keys see below to fix!
UPDATE sales_order_grid INNER JOIN sales_order ON sales_order_grid.entity_id = sales_order.entity_id SET sales_order_grid.customer_id = sales_order.customer_id;
-- check
SELECT orig.entity_id, res.entity_id, orig.customer_id, res.customer_id from magento2.sales_order as orig inner join mage_restore.sales_order as res on orig.entity_id=res.entity_id; 

Fix missing keys

If partial data exists in tables add keyword

ignore

in first UPDATE.
This situation arises if – after customer deletion – formerly existing customers created new accounts. So the old one can’t be created due to duplicate email addresses.
Check via

select orig.entity_id, res.entity_id, orig.customer_id, res.customer_id, c.email, c2.entity_id from magento2.sales_order as orig inner join mage_restore.sales_order as res on orig.entity_id=res.entity_id inner join mage_restore.customer_entity as c on res.customer_id=c.entity_id inner join magento2.customer_entity as c2 on c.email=c2.email where res.customer_id is not null and orig.customer_id is null;

You can fix those as well by matching the new customer account on the email address:

update magento2.sales_order as orig inner join mage_restore.sales_order as res on orig.entity_id=res.entity_id inner join mage_restore.customer_entity as c on res.customer_id=c.entity_id inner join magento2.customer_entity as c2 on c.email=c2.email set orig.customer_id=c2.entity_id where res.customer_id is not null and orig.customer_id is null;

In Magento2 you have to reindex customer_grid as final step!

Microsoft announces WSL 2

In an exciting move Microsoft announces WSL2 for Windows 10 as a successor for WSL – Windows Subsystem for Linux. WSL2 uses a real Linux kernel to be able to run native Linux executables on Windows.

The announcement mentions key features of WSL2 such as

„dramatic file system performance increases”
„you can run more Linux apps in WSL 2 such as Docker”

So probably this setup will be better suited for web development than MacOS (though not as good as the real deal Linux)
I will try my benchmark project fwshop2 with Docker on this new platform to compare to Linux and MacOS. The results for Linux and MacOS are documented in this article.

Tuning for Docker on Mac

Install Ubuntu 😉

Seriously: In a project all developers using a Mac had poor performance compared to those using a Ubuntu Linux system. While Docker per se is a Linux technology and obviously runs best on Linux the runtimes on Mac were way too slow to be acceptable. So we began research to optimize performance on Mac and ease our daily work.

During research i came across an article about tuning disk performance for Docker on Mac. All proposed steps seemed reasonable accept updating Docker to ‚edge‘ – this seems not necessary any more as the software is matured. Further insight gave an article about using NFS which we didn’t pursue.

First, we defined a disk heavy test task in our project to run on a container to measure runtimes for later comparison.

> time bin/console build
real    41m34.257s

For comparison: The same task ran in 4 minute 25 seconds on a Linux system! That’s 89% faster!

> time bin/console build
real    4m25s

1. Check disk image format

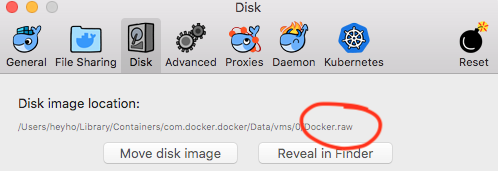
If you upgraded your Mac from an earlier MacOS version like Sierra or El Capitan to High Sierra or Mojave Docker might still be using its old disk format. If you’re still on .qcow2 then upgrade to .raw if system disk filesystem is APFS. Unfortunately this is easiest done by resetting Docker to factory defaults which deletes all images so all container images have to be downloaded and built again.

Check for disk image format: we want .raw for performance on APFS.

After resetting we build our images and measure 19% of speedup:

> time bin/console build
real    33m48.665s

2. Use :cached: for volumes

Simply add :cached: to volumes with many files/much disk I/O. Use an override file so your platform specific changes don’t have to be put in project wide docker-compose.yml. So here is a snippet from docker-compose.override.yml:

version: '3'
services:
  nginx:
    volumes:
      - .:/var/www/html:cached

We measure and achieve about of 44% of speedup:

> time bin/console build
real    18m57.775s
# a newer machine is even faster
> time bin/console build
real    16m20.238s

So all in we achieved 54% faster runtime for our test task! Unfortunately i didn’t find further improvements so we checked another approach.

3. Use Docker with Vagrant

We create a Vagrant machine based on Ubuntu 18.04 to run Docker. Vagrant’s provisioning is used to install latest Docker version. Key is to use NFS for good I/O performance. The Vagrantfile looks as follows:

Vagrant.configure("2") do |config|
    config.vm.box = "ubuntu/bionic64"

    config.vm.network :private_network, ip: "192.168.111.16"

    config.vm.provider :virtualbox do |v|
        v.customize ["modifyvm", :id, "--natdnshostresolver1", "on"]
        v.customize ["modifyvm", :id, "--memory", 2576]
        v.customize ["modifyvm", :id, "--name", "dockerdev"]
        v.customize ["modifyvm", :id, "--cpus", 2]
    end

    config.vm.synced_folder "../", "/vagrant", :type => "nfs", mount_options:['nolock,vers=3,udp,noatime,actimeo=1']
    config.vm.provision "shell", inline: <<-SHELL
      sudo apt-get update && sudo apt-get install \
        apt-transport-https \
        ca-certificates \
        curl \
        software-properties-common
      curl -fsSL https://download.docker.com/linux/ubuntu/gpg | sudo apt-key add -
      sudo apt-key fingerprint 0EBFCD88
      sudo add-apt-repository \
        "deb [arch=amd64] https://download.docker.com/linux/ubuntu \
        $(lsb_release -cs) \
        stable"
      sudo apt-get update && sudo apt-get -y install docker-ce docker-compose
      sudo usermod -aG docker vagrant
    SHELL
    # config.vm.provision :shell, path: "bootstrap.sh"
    config.ssh.forward_agent = true
end

After creating the box with vagrant up && vagrant ssh we start our Docker services. The newer machine reaches a pretty good time:

> time bin/console build
real	6m3.552s

So this is a pretty impressive improvement – all in all 85,5% – which allows working with Docker on a Mac.

Conclusion

Surprisingly Docker in a VirtualBox managend by Vagrant is faster than Docker for Mac!

This solution might be worth a try: https://github.com/davidalger/warden Under the hood it uses mutagen instead of NFS – don’t know, how that performs.

Rsnapshot auf Synology DSM

Ich nutze gerne das Backup-Tool rsnapshot, weil es einfach und zuverlässig funktioniert. Das erzeugte Backup ist platzsparend (via Nutzung von hard links) und erlaubt trotzdem sofortigen Zugriff auf Dateien ohne vorheriges zeitraubendes Entpacken.

Für Offsite-Backups bietet sich ein Synology NAS an, weil es gut funktioniert und sehr zuverlässig ist.

Auf der Synology ist rsnapshot nicht via DSM Package Manager installierbar.
Da es nur von Perl abhängt klappt die Installation auch einfach manuell:

1. Schritt:

Im DSM Package Manager in Rubrik „Entwickler“ Perl installieren.

Für die folgenden Schritte öffnen wir eine Shell auf der Synology:

2. Schritt:

rsnapshot aus tar entpacken und vorbereiten:

wget https://github.com/rsnapshot/rsnapshot/releases/download/1.4.2/rsnapshot-1.4.2.tar.gz
tar xvzf rsnapshot-1.4.2.tar.gz
cd rsnapshot-1.4.2
./configure 

3. Schritt:

Manuell installieren:

sudo su
cp rsnapshot rsnapshot-diff /usr/local/bin/
chmod 755 /usr/local/bin/rsnapshot /usr/local/bin/rsnapshot-diff
cp rsnapshot.conf.default /usr/local/etc/rsnapshot.conf
exit 

4. Schritt:

/usr/local/etc/rsnapshot.conf anpassen: Pfade eintragen, MySQL-Backup erstellen, ssh auskommentieren etc.

Ich muss folgende Ziele kommentieren, da rm beim Löschen alter Backups Fehler erzeugt und das Backup nicht durchgeläuft.

#cmd_rm     /bin/rm

5. Schritt:

Folgende Jobs sollte man im Aufgabenplaner anlegen – diese werden vom DSM in die crontab geschrieben. Hier in crontab-Notation:

40 1 * * *         rsnapshot daily
20 3 * * 6         rsnapshot weekly
10 5 1 * *         rsnapshot monthly

Fertig!

Google ReCaptcha in Magento 1 und 2

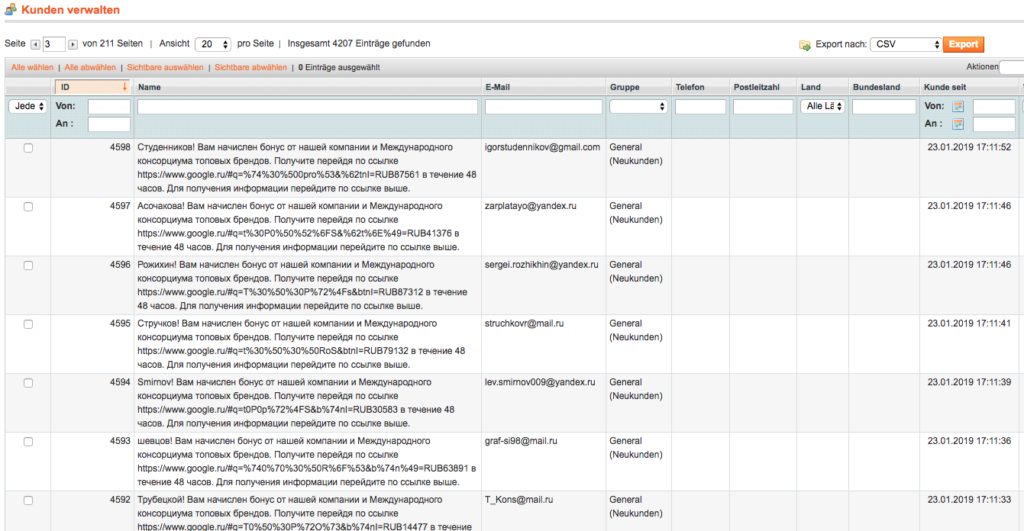
Bots sind seit längerem in der Lage, das in Magento 1 integrierte Captcha zu lösen. Dies führt dann zu haufenweise Kundenregistrierungen mit werblichen Referenzen wie im Screenshot dargestellt:

Werbliche Kundenregistrierungen

Gegen die Spam-Flut hilft die Umstellung auf Googles ReCaptcha. Für die Integration in Magento 1 habe ich gute Erfahrung mit der Extension ProxiBlue/reCaptcha gemacht. Variante „v2“ und Recaptcha Theme „I am not a Robot“ lassen das für Benutzer einfache Checkbox-Captcha erscheinen.

Für Magento 2 gibt es eine offizielle Anleitung zur Integration von ReCaptcha.

Aus meiner Sicht reicht die Aktivierung auf der Seite der Kundenregistrierung aus zur Eindämmung der Spam-Registrierungen.

Hiermit wird ein Dienst von Google eingebunden – es werden Benutzerdaten an einen Drittanbieter übergeben. Daher ist die Aufnahme in die Datenschutzerklärung notwendig. Am einfachsten lässt man sich auf ratgeberrecht.eu eine Datenschutzerklärung mit Hinweis auf alle integrierten Drittanbieterdienste generieren.

DATEV Backup – keep it simple

Wenn du einen Arbeitsplatz mit lokaler DATEV-Installation betreust, dann muss dieser ein- bis zweimal täglich gesichert werden (vor der Mittagspause und zum Feierabend bieten sich an).

Es gibt dafür jede Menge Lösungen – von DATEV-eigenen Lösungen bis zu replizierten Datenbanken oder Snapshots. Wir können das Problem jedoch auch einfach lösen, indem wir die gesamte Datenbank auf ein Netzlaufwerk kopieren, welches dann gesichert wird.

Dazu muss die Datenbank angehalten werden, damit ein konsistenter Zustand erzeugt wird. Dies kann nur ein Admin, daher brauchen wir 2 kleine Skripte.

Das erste Skript ruft das zweite mit Admin-Privileg auf:

@echo off
powershell.exe -Command "Start-Process c:\DATEV\backup.bat -Verb RunAs"

Das zweite beendet die Datenbank und startet das Backup:

@echo off
net stop MSSQL$DATEV_DBENGINE /Y
timeout /T 10 /nobreak
xcopy c:\DATEV\DATEN "\<server_name>\home\backup\DATEN" /S /E /C /H /R /Y /D
net start MSSQL$DATEV_DBENGINE